Google Cloud Platform (GCP) is Googles cloud based computing platform that allows our platform to integrate with googles features such as Maps, language translator, or Analytics.
Please follow these steps to create a GCP account for your business to use on our platform:
Step 1: Create a Google Cloud account
The first step is to create a
Google Cloud Console (click here for Googles KB article)
account. This section describes how to create a Google Cloud account. If you already have Cloud Identity or G Suite configured for your organization, you can skip to the next step (
Step 2: Create a Google Cloud project
).

If you choose to set up Cloud Identity, domain verification is required.
To create a Google Cloud account:
Open Google Cloud Console in a browser.
When prompted to sign in, create a new account by clicking Create account:
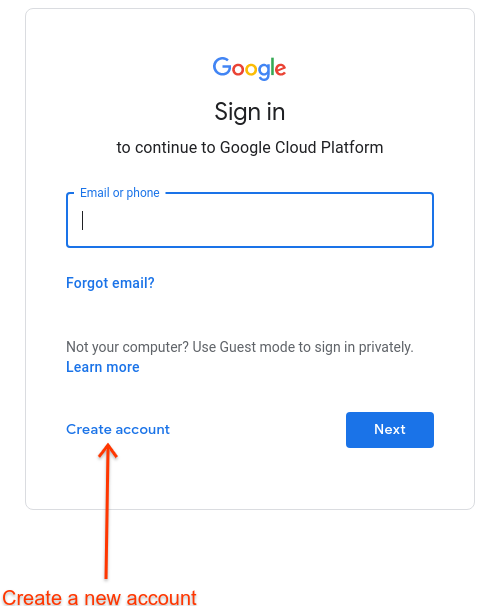
Follow the instructions to register your corporate email address as a Google account. Alternatively, you can use a Gmail account or other Google account.
Continue to the Google Cloud Console (click here), and accept the Google Cloud terms presented.
Step 2: Create a Google Cloud project
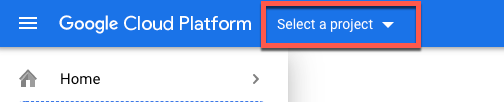
- Open the Google Cloud Console and log in with the account you created in Step 1: Create a Google Cloud account.
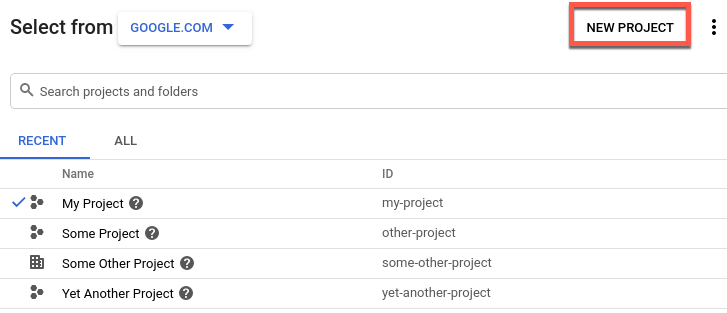
Click the project selector Select a project:
The project selector dialog box displays:
Click New Project.
The New Project view displays.
Enter a friendly name for your project in the Project name field. The project name can contain only letters, numbers, single quotes, hyphens, spaces, or exclamation points.
Google Cloud generates a corresponding project ID below the Project name field, as the following example shows.
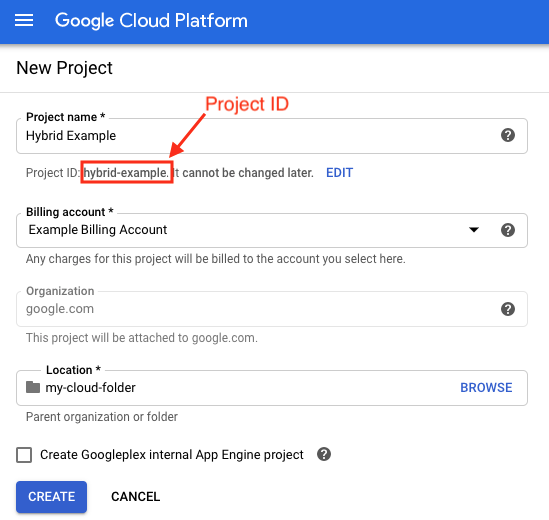
You can change the generated Project ID by clicking Edit, but the project ID must be unique. The project ID can have lowercase letters, digits, or hyphens, and must start with a lowercase letter.
Take note of the Project ID. You will use it later in this setup process.
 Note: After you create the project, you cannot change the project ID.

Set up Billing for your GCP account:
-
In the
Billing account field, select the Google Cloud billing account to use to pay for your project. If you do not yet have a Google Cloud billing account, see the following:
- In the Location field, select a folder for your project. Folders are an optional part of the Google Cloud project resource tree.
Click Create.
Google Cloud creates your new project.
Step 3: Manage users in the GCP UI
You can add users in the Google Cloud Console. When you do this, the user is granted the same access to all environments in the organization. However, you can refine each user's access by using the UI.
The UI lets you assign roles to users per environment: you use it to refine each user from having the same role in all environments to assigning a specific role or roles for that user for each environment.
This section describes how to add, change, and remove users with the UI.
Add user accounts in the UI
When you first configure and create the Google Cloud
project to which the organization is bound, you typically add a couple of users with different roles like
API Admin
and
Environment Admin.
Because these users were defined at the Cloud Project project level, they can access
all
environments with that level of access.
By using the UI, though, you can set roles of existing users at the environment level.
Note: Before you can add a new user (and specify environment-specific access for that new user) in the UI, you must add that user as a member of the Google Cloud project, as described in
Managing access in Google Cloud
.
Roles you assign in the Google Cloud project apply to all environments. Roles you assign in the UI apply only to the selected environment.
The roles drop-down list displays only predefined roles.
To specify user permissions for an environment:
- Ensure that you have already added the user to your Google Cloud project. For information on adding users to a Google Cloud project, see Google's KB Article on Granting, changing, and revoking access to resources.
- Open the GCP UI in a browser.
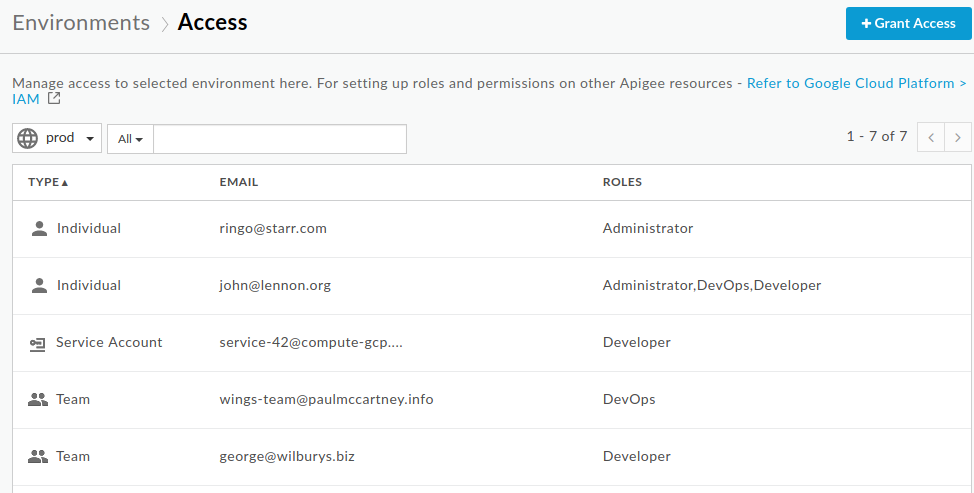
- Select Admin > Environments > Access in the left navigation menu.
-
Select the environment name from the drop-down list.
The UI displays a list of current user accounts and roles for the selected environment:
-
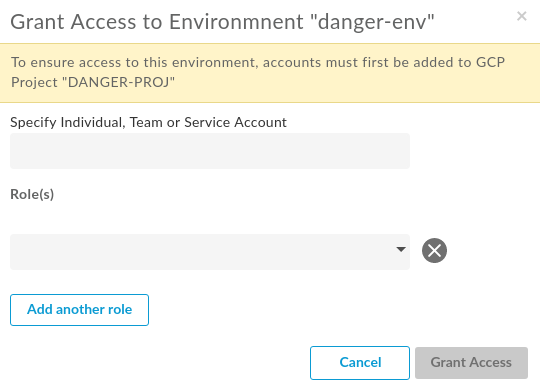
Click
+Grant Access.
The Grant Access to Environment dialog box displays:
-
Enter the user account's email address in the first field. This email address is typically one of the following:
- Select a role from the Role drop-down list and click Add. You can add more than one role for each user. For details on available roles, see Google's KB on roles and IAM permissions reference.
- Repeat this process for each environment for which you want to specify the user's role.
You can remove a user account from an environment using the UI, but that user account will still have the access that it was granted in the Google Cloud Console unless you also remove the user from the Console by default.
Remove user accounts
Removing a user at the environment level does not remove the user at the Google Cloud project level. As a result, the user can still access all environments with their Google Cloud project level permissions.
To revoke the user's access entirely, you must remove them from the Google Cloud project as described in Revoking Access to Google Cloud Platform.
To remove a user from an environment:
- Open the GCP UI in a browser.
- Select Admin > Environments > Access in the left navigation menu.
-
Select the environment name from the drop-down list.
The UI displays a list of current users for the selected environment.
-
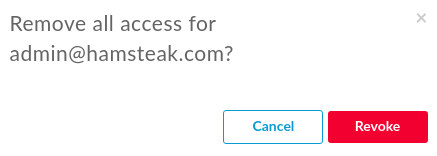
In the user's row, click delete.
The UI displays a confirmation dialog box:
-
Click
Revoke.
The UI removes that user from the environment.
Change user roles in the UI
You can change a user's role on a per-environment basis by using the UI. This includes adding additional roles to a user account or removing one or more roles from the user account.
To change a user's roles for an environment:
- Open the GCP UI in a browser.
- Select Admin > Environments > Access in the left navigation menu.
-
Select the environment name from the drop-down list.
The UI displays a list of current users for the selected environment.
-
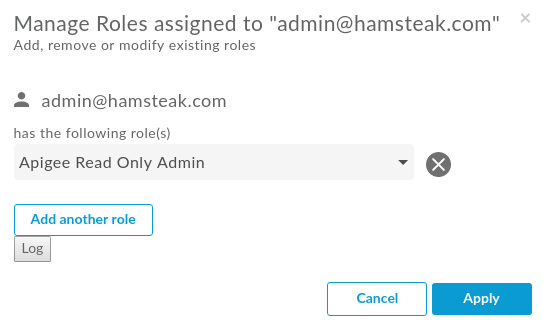
In the user's row, click edit:
Edit.
The UI displays the Manage Roles dialog box:
-
Do one of the following:
- To remove a role: Click Cancel next to that role.
- To change a role: Select a new role from the drop-down list of roles.
- To add another role: Click Add another role.
-
Click Apply.
The UI applies your changes to the user in that environment.
Related Articles
How do I create a Google Ads account?
Before you start creating ads using our Google Ads Manager, you must create a Google Ads account using your Gmail email address. Once you’ve created your account in Google Ads, select “Switch to Expert Mode”. This gives you more control over your ...
How can I use Google Smart Shopping campaigns?
Automated Google Smart Shopping campaigns To easily set up Google’s most up-to-date advertising features for e-commerce store owners – Smart Shopping campaigns and Free product listings – you can use integration between your store and Google. During ...
How do I run a Google Ads Campaign?
Creating a Google Ads Account Before you start creating ads using our Google Ads Manager, you must create a Google Ads account using your Gmail email address. Once you’ve created your account in Google Ads, select “Switch to Expert Mode”. This gives ...
How do I add more users to my booking platform?
You can use our booking platform as an individual or team. To add a new user, follow these instructions: Select the gear icon at the top right of your screen. Select Users to the left. Select Add user. Once you create a user, that user will receive ...
How do I create a Google Ads campaign?
To start creating your Google Ads campaign, log in to your dashboard and select the Ads Management tile. Select “Get Started”. Sign in with your email. Enter your password. Select “Allow”. To create a campaign, select “Create Campaign”. Complete ...